Simplifying GitLab Pipeline Security with OpenID Connect (OIDC) and AWS Authentication
Learn how to configure GitLab pipelines with OpenID Connect (OIDC). Discover step-by-step instructions for setting up an OIDC provider in AWS, creating IAM roles, and optimizing your .gitlab-ci.yml file for efficient authentication.
Felix Pafel - February 15, 2023

Managing AWS access keys for your GitLab pipeline can be a pain, as you have to rotate the environment variables
AWS_ACCESS_KEY_ID and AWS_SECRET_ACCESS_KEY
on a regular basis. But what if there was a better, more secure way to authenticate your pipeline to AWS?

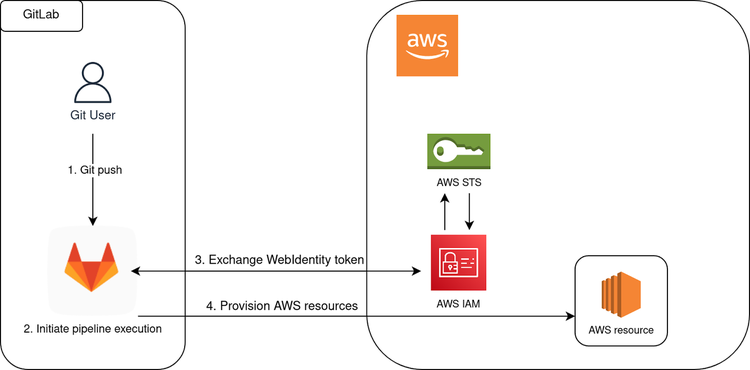
If you're using your own standalone GitLab instance, you can leverage it as an OpenID Connect (OIDC) provider, allowing you to manage access to AWS resources through AWS IAM roles.
Each GitLab pipeline run will generate its own temporary credentials by assuming the configured IAM role inside AWS.
In this post, we'll show you how to set up OIDC for your GitLab pipeline and use it to authenticate to AWS.
Setting up the OpenID Connect Provider in AWS
The first step is to set up the OpenID Connect provider inside AWS. You can do this using Terraform.
resource "aws_iam_openid_connect_provider" "gitlab_oidc" {
  url = "https://yourgitlabinstance.com"
  client_id_list = [
    "https://yourgitlabinstance.com",
  ]
  thumbprint_list = ["${var.thumbprint}"]
}
Second step
To get the thumbprints, you can use the following shell script:
#!/bin/bash
GET_THUMBPRINT=$(openssl s_client -connect yourgitlabinstance.com:443 -showcerts </dev/null 2>/dev/null | openssl x509 -in /dev/stdin -sha1 -noout -fingerprint)
THUMBPRINT=$(echo "${GET_THUMBPRINT}" | sed 's/SHA1 Fingerprint=//g' | sed 's/://g')
echo ${THUMBPRINT} | awk '{print tolower($0)}'
Third step
You can add this to your Terraform plan step:
terraform plan -var "thumbprint"=$(shell sh get-thumbprint.sh)Fourth step
The next step is to add the IAM role used by your pipeline. In addition to the IAM and service permissions you need to provision your resources, you must also add an IAM policy that allows the role assumption via OIDC.
resource "aws_iam_role" "gitlab_ci" {
  name = "gitlab-ci"
  assume_role_policy = data.aws_iam_policy_document.gitlab_assume_federation.json
  managed_policy_arns = [
    aws_iam_policy.gitlab_iam_permissions.arn,
    aws_iam_policy.gitlab_service_permissions.arn
  ]
}

data "aws_iam_policy_document" "gitlab_assume_federation" {
  statement {
    actions = ["sts:AssumeRoleWithWebIdentity"]
    principals {
      type        = "Federated"
      identifiers = ["${aws_iam_openid_connect_provider.gitlab_oidc.arn}"]
    }
    condition {
      test     = "StringEquals"
      variable = "yourgitlabinstance.com:aud"
      values   = ["https://yourgitlabinstance.com"]
    }
  }
}

resource "aws_iam_policy" "gitlab_iam_permissions" {
  name   = "gitlabIAMpermissions"
  policy = data.aws_iam_policy_document.gitlab_iam_permissions.json
}

resource "aws_iam_policy" "gitlab_service_permissions" {
  name   = "gitlabservicepermissions"
  policy = data.aws_iam_policy_document.gitlab_service_permissions.json
}

data "aws_iam_policy_document" "gitlab_service_permissions" {
  statement {
    actions   = ["s3:..."]
    resources = ["..."]
  }
  statement {
    actions   = ["route53:..."]
    resources = ["..."]
  }
}

data "aws_iam_policy_document" "gitlab_iam_permissions" {
  statement {
    actions = [
      "iam:..."
      ]
    resources = ["..."]
  }
}
With this being set you can start to configure your pipeline. Use the following code snippet as part of your project's GitLab pipeline definition.

Replace `ACCOUNT_ID` with the actual ID of the AWS account that should be accessed by your pipeline.

.gitlab-ci.yml:
 -- export $(printf "AWS_ACCESS_KEY_ID=%s AWS_SECRET_ACCESS_KEY=%s AWS_SESSION_TOKEN=%s"
  $(aws sts assume-role-with-web-identity
     --duration-seconds 900
     --role-session-name "cicd"
     --role-arn arn:aws:iam::ACCOUNT_ID:role/gitlab-ci
     --web-identity-token "${CI_JOB_JWT_V2}"
     --query "Credentials.[AccessKeyId,SecretAccessKey,SessionToken]"
     --output text
    )
  )
-- aws configure set aws_access_key_id "${AWS_ACCESS_KEY_ID}" --profile default
-- aws configure set aws_secret_access_key "${AWS_SECRET_ACCESS_KEY}" --profile default
-- aws configure set aws_session_token "${AWS_SESSION_TOKEN}" --profile default
Fifth step
Once this is set, you can start configuring your pipeline. Use the following code snippet for your project's GitLab pipeline definition.
Replace `ACCOUNT_ID` with the actual ID of the AWS account that should be accessed by your pipeline.
.gitlab-ci.yml:
 -- export $(printf "AWS_ACCESS_KEY_ID=%s AWS_SECRET_ACCESS_KEY=%s AWS_SESSION_TOKEN=%s"
  $(aws sts assume-role-with-web-identity
     --duration-seconds 900
     --role-session-name "cicd"
     --role-arn arn:aws:iam::ACCOUNT_ID:role/gitlab-ci
     --web-identity-token "${CI_JOB_JWT_V2}"
     --query "Credentials.[AccessKeyId,SecretAccessKey,SessionToken]"
     --output text
    )
  )
-- aws configure set aws_access_key_id "${AWS_ACCESS_KEY_ID}" --profile default
-- aws configure set aws_secret_access_key "${AWS_SECRET_ACCESS_KEY}" --profile default
-- aws configure set aws_session_token "${AWS_SESSION_TOKEN}" --profile default
In conclusion, integrating OpenID Connect (OIDC) with your GitLab pipeline and AWS can significantly enhance the security and efficiency of your continuous integration and delivery processes.
With this setup, you can easily authenticate your users and control access to your resources, enabling a seamless and secure collaboration among your team.
So, if you want to take your DevOps practices to the next level, consider implementing OIDC today!